Friday 3 January 2014

Great end to 2013

Leading up to Christmas 2013, Cheryl hinted and hinted at the idea of getting me a watch. I've been without a watch for a while, and she's even asked if I wanted to go in shops looking for one. I even asked her if her present to me was something I'd not had for a while and she laughed. Come Christmas morning, she gives me a small wrapped gift. I tear back the paper and it's a tin, the kind of tin a watch would come in.

I read the top of the tin lid to see it's a QHY5L-ii guide camera / CCD camera. Chuffed to pieces would be an understatement of how happy I was. I jokingly put this on my Christmas list as it's a fair piece of money, so couldn't believe she'd actually bought it.

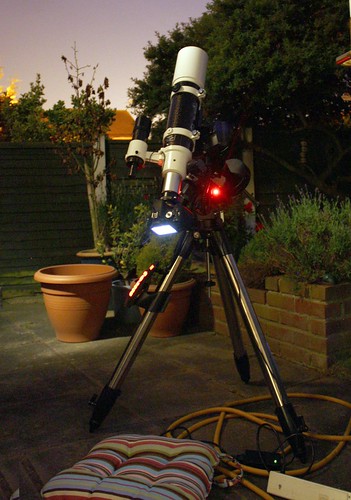
Jump to a few days later, I've sussed out the way it fixes to my finderscope and installed the required software on my laptop. Part of me was hoping for plenty of clouds as it's always a little daunting getting a new piece of equipment in the hobby of astrophotoraphy - nothing is ever simple or straightforward.

Surprisingly, after maybe an hour of playing around and clicking different buttons, I managed to get the guide camera fixed on a star (for those of you that don't know, a guide camera "watches" a selected star and tells the mount to follow it exactly, you could say the guide cam acts as an eye for the mount).


My first image captured using the guidecam was the Triangulum Galaxy (Messier 33). This shot below was a total of 29 minutes exposure, with each image at an exposure of 160 seconds. Before the guidecam I was unable to image longer than 70 - 80 seconds without the stars trailing off. Safe to say this camera is doing its job!


Which brings me on to my final image of 2013...

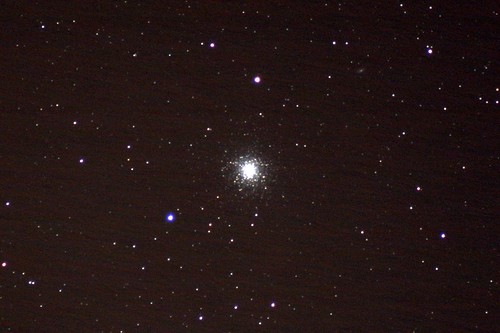
The Horsehead nebula has always been my favourite nebula in the night sky - having never seen it, I've always awed over images online and in books. The mysterious dark cloud in front of the nebula, forming the shape of a horses head looking away from you into the dark distance of the universe.

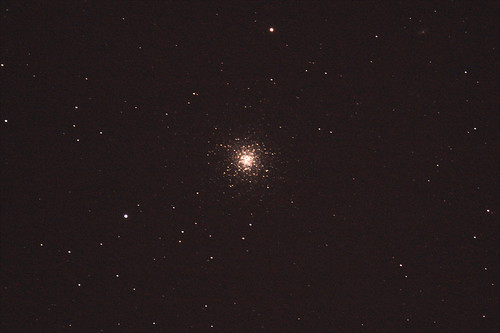
New Years eve 2013 I headed out with all my equipment and set up, with only one target in mind. Cheryl was busy inside baking cookies, neither of us really caring much for the hyped up day of the week.

After almost two hours inside, I came in with the captured images and spent around an hour editing the curves and levels of the final stacked result. This image is around 20 minutes of exposure (I had a few problems along the way which caused a few shots to fail sadly) and is most likely my favorite shot so far. I can't wait to get out and try again when the weather clears.


Thursday 17 October 2013

How to: Photograph the Moon with HDR

This will just be a quick run through how I take photos of the moon. My equipment used is a Skywatcher 80ED telescope (equivelant of a 600mm lens) with a Canon 600D mounted to it. A remote trigger was also used.


Picture settings are set to Manual, RAW files, with bracketing switched on and ISO set to 400. I then use the live-view and 10x zoom on the edge to perfect the focus using the telescope. I'll set the shutter speed (no aperture don't forget!) so the moon has average tones and then take the 3 bracketed shots. I'll then adjust the initial shutter speed slightly to change the exposures further. This evening I took 5 sets of bracketed shots (15 photos in total). 

I then open every 3rd image to see the quality of it on a bigger scale. If I find a set of 3 that I'm reasonably happy with I'll load the 3 chosen images into Photomatix (or your preferred HDR-type program). 

In this case the B&W Natural preset gives a nice range of tones. 


I'm very new to processing HDR so I don't generally fiddle around with it to much. Once I've exported the HDR shot, I'll stick it in photoshop and touch up some of the layers. 


Finally, crop and save.


Sunday 4 August 2013

Report: 29 July - Hedgehogs

I know it hasn't been long since the last one - but then the weather is meant to turn nasty for the rest of the week so was very grateful for the clear skies given to me this evening. I started out with my list of objects I wanted to try find, with their written mag and a rough idea of what they were. This saves me having to continuously go back in to look at a computer screen and lose my night vision. I attached the list for your interest! I started off with M34 and M15 - two clusters, sadly both of which obstructed by a hedge or a house. So I moved on to M92 and was straight away impressed, a really nice cluster to shoot - really recommend it.

M92


I then got a bit distracted by a rustling, sure enough, our local hedgehog has decided to come see what I'm taking photos of. I watched him for a bit with the red-light which doesn't seem to bother him - then told my girlfriend (who loves hedgehogs and wants to attract more to our garden) who then came out to see our spiky friend, who then didn't like the crowd and made a run for it.

Back to the telescope, after 10 mins or so exposure on M92, I moved onto M29 and M103, who seem to be quite different from your usual cluster. These two are Open (rather than globular) and therefore look like they have a small pattern of prominent stars grouped together. Again, another 2 lots of ~10mins exposures on each of these and I moved on.

M29

M103

I felt a bit sorry for the hedgehog, so I got some mealworms we feed the birds with and put some on the ground near where he was seen the last time, hopefully to tell him we're friends not foe and wish him to return!

Having already captured the targets I initially set out to get, I used my phone to navigate the sky and see what objects were visible and were located in the clearest areas of the sky. I then added M71 - a globular cluster to my list, and was very happy that it had just about cleared the roof of my house - another 10 mins exposure!

M71

While happily gazing into space and listening to the camera click, I heard another sound that caught my attention. It's difficult to describe what the slobbery sound was, but of course, it was the hedgehog feasting on the worms we put down. They are very loud eaters! I expect to find a load of dribble on our patio tomorrow morning where he had his feast, but was pretty happy we managed to lure him back!

I then discovered on my phone an object in clear skies called M40 - a Double star. Double star? What was Messier thinking? M40 - also known as Winnecke 4 - a double star in Ursa Major; stealing this from Wiki: "one of the few real mistakes in the Messier catalog," faulting Messier for including it when all he saw was a double star, not a nebula of any sort." Still, I was happy to capture it, and to tick it off my Messier list, even if it was one of his mistakes!

I then packed away my things, left the hedgehog to roam round the rest of the garden without fear of the red-light monster with a clicking contraption, and am now very happy having had such a pleasurable and successful evening capturing the stars.

Friday 26 July 2013

Report: The hunt for Messier Objects

I went to the pub with a few friends from the local photographic society, and eventually got home about 23:30. I looked up, as I always do, and saw it was a good clear night (you know - when you just seem to see more stars than usual). So decided to quickly cart my gear into the garden and set up. 

Galaxies M81 and M82
Click for annotated version
By around midnight I was set up and aligned - I'm starting to love the routine of setting up now - tripod facing N? check, tripod level? check, Polaris aligned? check, north star focused at 10x zoom with DSLR? check. Once I was star aligned I popped back into the house to look at my report of what there is to see that night, wrote down in my notebook M39 - an open cluster in Cygnus. Having looked at a few images of it, I saw it wasn't your usual cluster (no cloudy blob of stars) so I noted down a rough sketch of what I should be looking for.


So I head downstairs and outside, and punch in M39 on the keypad and watch it slew to the right position. I look up to see... cloud. Bright lit-up-by-the-goddamn-moon type of cloud, moving in. I quickly fired the shutter for 30s to see if I could at least catch something before the cloud came in, but looking at the image after - a hazy blank image with the most prominent stars just shining through.

So I headed in and shouted at my girlfriend about how annoying it all was and she said to just wait a bit, it may pass. But of course, I'm sure you all know, there's never an opening in the cloud! I then noticed there was a clear area of sky lower down toward the horizon, so quickly found some more targets to try out. Armed with my list - M51, M52, M81, M101, I had another go.

M52 - Open Cluster in Cassiopeia
Click for annotated version
First, the pinwheel and whirlpool galaxies - I managed to capture them, but laughed at how feint they were and decided to leave them for another night. Then I moved onto M81 & M82 and got a surprise, they were surprisingly clear - however, due to the theme of the night, it wasnt perfect. The neighbours tree decided to stick a branch right through my field of view. A few more swear words and I then slewed over to M52 - Open cluster in Cassiopia - it was there my luck changed. It looked stunning, a clear hazy cloud of stars on a black background was what met me on my camera screen. I spent about 10 minutes then capturing exposures to stack. I then moved back to M81 & M82, to see if they'd moved clear of the branch - to which they had :-) Good times! - another 10 or so minutes worth of exposures on these and I then realised the clouds had passed, revealing M39 - my original target. A quick final slew and there it was, clear as anything. I took a few shots, then compared the formation of the stars to my sketch - even showed my girlfriend who was very impressed how I found such a formation in the sky that was exactly the same to what I had planned/drawn out. Another 10 minutes or so of exposures and I decided to call it a night.

M39 - Open cluster in Cygnus
Click for annotated version

The only thing I am a little disappointed with, is I completely forgot to get some dark frames. Though my last few sessions have mainly used the same camera settings so could possibly use some of those.

I finished viewing at around 01:00. Came inside, then wrote down the file numbers of each object from - to, as I find this is much easier when I come to stacking as I know which RAW files to stack - considering I can't preview the image quickly.

The following day I processed the images using Deepskystacker 3.3.3 (beta version) and then touched up the images in Photoshop CS5. I'm really happy with how they came out, especially the two galaxies.

Thursday 11 July 2013

Report: First light with Evostar 80ED

New Telescope - Evostar ED80 on CG-5I returned home from work yesterday just to meet the delivery driver at the door, to receive my new Skywatcher 80ED telescope. Unboxing it I felt like a child at Christmas, slowly taking pieces out of their protective bags and looking at them wondering what each bit did and what goes where. I first mounted the scope on my CG-5 and just played around with the balances, counterweight, and just getting a feel for it. There it stayed until it got dark (my girlfriend wasn't too impressed with it being left in front of the TV and her being too afraid to move it knowing I've spent an entire months salary on it all).

Then a miracle happened, I had clear skies. They weren't perfect as here in the UK has been very hot and muggy, so there is a slight haze lingering around in the evenings, and I went out pretty early - Polaris was quite faint as it wasn't long after full sunset, but I was eager to get out there and playing. Having lined up the mount with Polaris, I had a look through the camera's viewfinder (camera attached with a t-ring to the back of the scope) and was greatly surprised to find Polaris in sight, not right in the middle, but it was there. I then aligned the mount with Arcturus, Dubnhe and Deneb? (I think!) and took this opportunity to line up the finder scope, which always surprises me by how much you can see through them.

First target was the globular cluster in Hercules (M13). I took a few exposures, and initially noticed I was slightly out of focus. To fix this I navigated to the nearest bright star using the GoTo and used the 10x digital zoom to make tuning much more accurate. The fine-tuning focuser really helped too. Back to Hercules and things were much clearer, though in fairness it did seem to come out similarly to when I was capturing it with my 300mm lens.

I tried out a few other targets, the pinwheel galaxy was unsuccessful, and I couldn't even make out the feint shape of it like I could with my 300mm. The Dumbbell nebulawas visible, but a little faint, and again similar result to the 300mm lens. So I decided not to get too disheartened and went back to the Hercules cluster. I took roughly 4 minutes worth of 30s exposures, and ended up with the following result:

Hercules Cluster M13 through Skywatcher Evostar ED80


I'm happy with the result, but it's a little darker than I'd have liked but I didn't want to burn out the centre as I have with my previous attempts.

Here is the same target with the 300mm lens and around 15 minutes of exposure, I took this a week or so ago:

Hercules Globular Cluster - M13

When comparing the two, I think the ED80 clearly shows more details and especially from a shorter total exposure. I now just have to find a way to prevent the middle from becoming burnt out and over exposed.

I have to admit, my first impressions of the scope are good, but there is a little doubt. The results from this first session were very similar to what I was getting with the 300mm lens. I know full well that this telescope is a good tube, and I know i'll be able to get some great photos with it, but at the moment I don't think I'm seeing that just yet. There is clearly much more room to work on and more to learn, and hopefully I'll be able to see real improvements compared to images with the 300mm lens (otherwise I'll feel like I've wasted a bit of money!).

Tuesday 9 July 2013

Andromeda Galaxies

Andromeda is the closest galaxy to our own, and is getting closer. Eventually the two galaxies will collide and become one great galaxy (we're talking billions of years however). It's a good target for any astronomer, and on a clear night is visible with the naked eye. Currently it isn't in an ideal part of the sky for viewing, as it is quite low down and close to the horizon - it only starts to become clearer at around 01:00am.

The first sighting of Andromeda with the 300mm lens on the CG-5 mount came out pretty well. The following shots were taken from a few separate exposures and a few dark frames put together in Deep Sky Stacker.

I'm really happy with the fact I caught two other galaxies within it (click the image to see labels) as I didn't expect to be able to pick them up. I know the final image isn't great - but it's definitely something to work and build upon.

Andromeda M31, M32, M110 (Big) [40 of 52]

Monday 8 July 2013

M13 Cluster in Hercules

M13 is a globular cluster within the Hercules constellation, formed of about 300,000 stars. This was one of my first target with my new tracking mount, as it's a little fainter than other targets but still visible with a pair of binoculars.

Having set the mount to find the cluster, I took a few shots and was a little confused - I couldn't see anything resembling a cluster and as it was one of the first uses of my new mount - being a total novice I was sure something wasn't right. So I popped indoors to check on Stellarium where the cluster sits within the Hercules constellation - a quick diagram drawn on a post-it note helped me pin point it. It turns out I had captured it, but it was a lot smaller and fainter than I initially thought. The first shot below shows the image I initially captured, if you click on the image you will see where on the image the cluster is.


Hercules and M13
The constellation of Hercules, with M13 visible left of centre at the top

This weekend just gone, I stayed at my parents who live on the coast and have much darker skies. I stayed out for a few hours before tiredness got the better of me. I had three targets in mind, one of them being M13 again. 

This time I took 16 minutes worth of exposures, with 8 minutes of 'dark frames' which are used to subtract any noise on the sensor itself. I was pleasantly surprised with the outcome, after a few hours trying to get a decent results from the shots I took - the clear build up of stars as it gets toward the centre is pretty fascinating. 


Hercules Globular Cluster - M13
16 minutes of exposure on M13 - Hercules globular cluster