Friday 26 July 2013

Report: The hunt for Messier Objects

I went to the pub with a few friends from the local photographic society, and eventually got home about 23:30. I looked up, as I always do, and saw it was a good clear night (you know - when you just seem to see more stars than usual). So decided to quickly cart my gear into the garden and set up. 

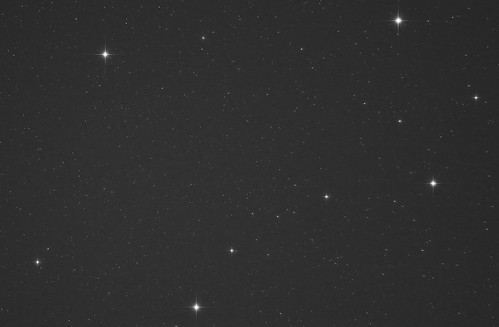
Galaxies M81 and M82
Click for annotated version
By around midnight I was set up and aligned - I'm starting to love the routine of setting up now - tripod facing N? check, tripod level? check, Polaris aligned? check, north star focused at 10x zoom with DSLR? check. Once I was star aligned I popped back into the house to look at my report of what there is to see that night, wrote down in my notebook M39 - an open cluster in Cygnus. Having looked at a few images of it, I saw it wasn't your usual cluster (no cloudy blob of stars) so I noted down a rough sketch of what I should be looking for.


So I head downstairs and outside, and punch in M39 on the keypad and watch it slew to the right position. I look up to see... cloud. Bright lit-up-by-the-goddamn-moon type of cloud, moving in. I quickly fired the shutter for 30s to see if I could at least catch something before the cloud came in, but looking at the image after - a hazy blank image with the most prominent stars just shining through.

So I headed in and shouted at my girlfriend about how annoying it all was and she said to just wait a bit, it may pass. But of course, I'm sure you all know, there's never an opening in the cloud! I then noticed there was a clear area of sky lower down toward the horizon, so quickly found some more targets to try out. Armed with my list - M51, M52, M81, M101, I had another go.

M52 - Open Cluster in Cassiopeia
Click for annotated version
First, the pinwheel and whirlpool galaxies - I managed to capture them, but laughed at how feint they were and decided to leave them for another night. Then I moved onto M81 & M82 and got a surprise, they were surprisingly clear - however, due to the theme of the night, it wasnt perfect. The neighbours tree decided to stick a branch right through my field of view. A few more swear words and I then slewed over to M52 - Open cluster in Cassiopia - it was there my luck changed. It looked stunning, a clear hazy cloud of stars on a black background was what met me on my camera screen. I spent about 10 minutes then capturing exposures to stack. I then moved back to M81 & M82, to see if they'd moved clear of the branch - to which they had :-) Good times! - another 10 or so minutes worth of exposures on these and I then realised the clouds had passed, revealing M39 - my original target. A quick final slew and there it was, clear as anything. I took a few shots, then compared the formation of the stars to my sketch - even showed my girlfriend who was very impressed how I found such a formation in the sky that was exactly the same to what I had planned/drawn out. Another 10 minutes or so of exposures and I decided to call it a night.

M39 - Open cluster in Cygnus
Click for annotated version

The only thing I am a little disappointed with, is I completely forgot to get some dark frames. Though my last few sessions have mainly used the same camera settings so could possibly use some of those.

I finished viewing at around 01:00. Came inside, then wrote down the file numbers of each object from - to, as I find this is much easier when I come to stacking as I know which RAW files to stack - considering I can't preview the image quickly.

The following day I processed the images using Deepskystacker 3.3.3 (beta version) and then touched up the images in Photoshop CS5. I'm really happy with how they came out, especially the two galaxies.

Thursday 11 July 2013

Report: First light with Evostar 80ED

New Telescope - Evostar ED80 on CG-5I returned home from work yesterday just to meet the delivery driver at the door, to receive my new Skywatcher 80ED telescope. Unboxing it I felt like a child at Christmas, slowly taking pieces out of their protective bags and looking at them wondering what each bit did and what goes where. I first mounted the scope on my CG-5 and just played around with the balances, counterweight, and just getting a feel for it. There it stayed until it got dark (my girlfriend wasn't too impressed with it being left in front of the TV and her being too afraid to move it knowing I've spent an entire months salary on it all).

Then a miracle happened, I had clear skies. They weren't perfect as here in the UK has been very hot and muggy, so there is a slight haze lingering around in the evenings, and I went out pretty early - Polaris was quite faint as it wasn't long after full sunset, but I was eager to get out there and playing. Having lined up the mount with Polaris, I had a look through the camera's viewfinder (camera attached with a t-ring to the back of the scope) and was greatly surprised to find Polaris in sight, not right in the middle, but it was there. I then aligned the mount with Arcturus, Dubnhe and Deneb? (I think!) and took this opportunity to line up the finder scope, which always surprises me by how much you can see through them.

First target was the globular cluster in Hercules (M13). I took a few exposures, and initially noticed I was slightly out of focus. To fix this I navigated to the nearest bright star using the GoTo and used the 10x digital zoom to make tuning much more accurate. The fine-tuning focuser really helped too. Back to Hercules and things were much clearer, though in fairness it did seem to come out similarly to when I was capturing it with my 300mm lens.

I tried out a few other targets, the pinwheel galaxy was unsuccessful, and I couldn't even make out the feint shape of it like I could with my 300mm. The Dumbbell nebulawas visible, but a little faint, and again similar result to the 300mm lens. So I decided not to get too disheartened and went back to the Hercules cluster. I took roughly 4 minutes worth of 30s exposures, and ended up with the following result:

Hercules Cluster M13 through Skywatcher Evostar ED80


I'm happy with the result, but it's a little darker than I'd have liked but I didn't want to burn out the centre as I have with my previous attempts.

Here is the same target with the 300mm lens and around 15 minutes of exposure, I took this a week or so ago:

Hercules Globular Cluster - M13

When comparing the two, I think the ED80 clearly shows more details and especially from a shorter total exposure. I now just have to find a way to prevent the middle from becoming burnt out and over exposed.

I have to admit, my first impressions of the scope are good, but there is a little doubt. The results from this first session were very similar to what I was getting with the 300mm lens. I know full well that this telescope is a good tube, and I know i'll be able to get some great photos with it, but at the moment I don't think I'm seeing that just yet. There is clearly much more room to work on and more to learn, and hopefully I'll be able to see real improvements compared to images with the 300mm lens (otherwise I'll feel like I've wasted a bit of money!).

Tuesday 9 July 2013

Andromeda Galaxies

Andromeda is the closest galaxy to our own, and is getting closer. Eventually the two galaxies will collide and become one great galaxy (we're talking billions of years however). It's a good target for any astronomer, and on a clear night is visible with the naked eye. Currently it isn't in an ideal part of the sky for viewing, as it is quite low down and close to the horizon - it only starts to become clearer at around 01:00am.

The first sighting of Andromeda with the 300mm lens on the CG-5 mount came out pretty well. The following shots were taken from a few separate exposures and a few dark frames put together in Deep Sky Stacker.

I'm really happy with the fact I caught two other galaxies within it (click the image to see labels) as I didn't expect to be able to pick them up. I know the final image isn't great - but it's definitely something to work and build upon.

Andromeda M31, M32, M110 (Big) [40 of 52]

Monday 8 July 2013

M13 Cluster in Hercules

M13 is a globular cluster within the Hercules constellation, formed of about 300,000 stars. This was one of my first target with my new tracking mount, as it's a little fainter than other targets but still visible with a pair of binoculars.

Having set the mount to find the cluster, I took a few shots and was a little confused - I couldn't see anything resembling a cluster and as it was one of the first uses of my new mount - being a total novice I was sure something wasn't right. So I popped indoors to check on Stellarium where the cluster sits within the Hercules constellation - a quick diagram drawn on a post-it note helped me pin point it. It turns out I had captured it, but it was a lot smaller and fainter than I initially thought. The first shot below shows the image I initially captured, if you click on the image you will see where on the image the cluster is.


Hercules and M13
The constellation of Hercules, with M13 visible left of centre at the top

This weekend just gone, I stayed at my parents who live on the coast and have much darker skies. I stayed out for a few hours before tiredness got the better of me. I had three targets in mind, one of them being M13 again. 

This time I took 16 minutes worth of exposures, with 8 minutes of 'dark frames' which are used to subtract any noise on the sensor itself. I was pleasantly surprised with the outcome, after a few hours trying to get a decent results from the shots I took - the clear build up of stars as it gets toward the centre is pretty fascinating. 


Hercules Globular Cluster - M13
16 minutes of exposure on M13 - Hercules globular cluster

Monday 1 July 2013

How to: Capture Star Trails

3 hrs 45 mins by CJ Isherwood
Meteor on the right
Star trails have been something I've wanted to photograph since I first became aware of them around a year ago. The patience of spending all night in the garden with your camera in the freezing cold put me off slightly, but lately due to a clear window and some clear skies, I've managed to get the same results indoors.

This guide will briefly (and as simply as I can) explain the process I took to get these results by stacking multiple images together to create one final long-exposure image.

The first step is to set the camera up. For these images I use continuous shoot mode, with 30 second exposure and a low ISO (around 400) to keep the grain down. I'll set the aperture once the camera is pointing at the sky as it depends on how dark/light the sky is.

I've been taking my latest star trail shots through a back window in a spare room. By positioning the tripod against the wall, I can get the camera as close to the window as possible (try make sure the window is clean too!). Adding a bit of support to the tripod legs to stop any movement or slippage during the night. 

Once my shutter speed, shooting mode ISO are set, and I'm happy with the aperture, I use a wired external remote with locking switch to begin shooting. Continuous shoot mode will continually take shots while the remote button is pressed.

I'll then, usually, go to bed. You will usually find the camera silent in the morning, having drained all battery life. I've been told that when the sensor is activated is when the camera uses the most power, so continuous shots drain it pretty quick - however you should still get 5 - 7 hours of shooting out of a full charge (on my Canon 1000D anyway).

I'll then review the photos on screen, checking every 15 - 30 shots for clouds. Some trails I have had to cut short as clouds tend to come along after a few hours, in this case, I'll discard these from the final edit.

To stack the good images I use a program on the Macbook called Starstax (will add a link). This program, simply put, takes all the photos you select and stacks them together. Very simple to use indeed so no real need to explain further in this.

The stacking will show you each image as it stacks it, 2 or 3 per second, which is interesting to watch as you can see your photo gradually building up - star trails gradually getting longer. Occasionally you may see a plane fly past, or if you're lucky a meteor suddenly appear. By watching the stacking process you can also identify any shots that need touching up, for example last night I had to edit 4 or 5 photos after noticing a neighbour used a spotlight, thus filling the shot with an over-exposed foreground and bit of lens flare. A quick touch up in Photoshop on these images quickly solves this. If you chose not to touch these up, and simply delete these images, you will have gaps in your trails.

Once the stacking is complete, you can save the final image onto your computer.

Winter Star trails
2 hours 38 minutes

I tend to open the final image in Photoshop to see if it needs any touching up or colours fixed. I generally make the sky a little darker black/blue as so much exposure can make it pretty light/purple. I may also touch up the light pollution at the bottom of the shot.

I'm now pretty confident with this process, but am continuing to play around with different angles and parts of the sky. I'm also trying to hunt down some meteors of course ;-)